Resin Documentationhome company docs
app server 
app server

resin installationResin Step-by-Step Installation Guide If you've decided that you're ready to deploy Resin for production, this page will guide you through the steps to install this powerful application server system-wide. You'll see where we recommend installing the various components of Resin as well as some basic production tuning tips. This page is for you if you:
This page leads you step-by-step through the installation of Resin. After going through these steps, you'll have a full Java and PHP Application Server able to serve even the most demanding web sites. You'll learn:
Preparing for installation
Installing Resin on Unix or Mac OS XIf you're installing Resin on Windows, you can skip to the next section. If you're installing Resin on Ubuntu or Debian and want to use the .deb packaged version of Resin, skip to the end of this section. Configuring the build process for ResinNext we'll change into the Resin directory we just unpacked to configure and build the server. The Java portions of Resin are already compiled, but this step will build additional C-based components of Resin that provide additional functionality such as:
(* only available in Resin Professional) The following command installs Resin and its files into the recommended locations on the file system:
./configure --prefix=/usr/local/share/resin \
            --with-resin-root=/var/resin \
            --with-resin-log=/var/log/resin \
            --with-resin-conf=/etc/resin
The above configure options are the default. You don't need to specify them unless you
decide to install Resin differently.
This will configure Resin to install in ,
with support for OpenSSL if it was detected, but without support
for Apache. If you want to use Apache or another 3rd party HTTP
server in front of Resin (unrecommended), please take a look
at our third-party HTTP server
setup documentation. If you need to configure other options
with Resin, now is the time to do it. Please consult Once you've run the configuration successfully, the configure script will display a summary like the following:
Resin Configuration summary:

  RESIN_HOME  : /usr/local/share/resin
      root    : /var/resin
      conf    : /etc/resin
      log     : /var/log/resin
      plugins : common apache2 resin_os resin resinssl
  JAVA_HOME: /System/Library/Java/JavaVirtualMachines/1.6.0.jdk/Contents/Home

    + 64-bit JNI in -I/System/Library/Java/JavaVirtualMachines/1.6.0.jdk/Contents/Home/include
    + JNI CFLAGS: -g -O2 -DPOLL -D_POSIX_PTHREAD_SEMANTICS -DB64 -DHAS_SOCK_TIMEOUT -DHAS_JVMTI
    + poll() for keepalives
    + OpenSSL 0.9.8l 5 Nov 2009
        OpenSSL include: /usr/include
        OpenSSL lib: /usr/lib
        OpenSSL libraries:  -lssl -lcrypto

  Apache: /usr
      conf: /private/etc/apache2/httpd.conf
      libexec: /usr/libexec/apache2
      include: /usr/include/apache2
      CFLAGS:   -DDARWIN -DSIGPROCMASK_SETS_THREAD_MASK
Building and Installing ResinNow that you've configured the Resin build process, all you need to do is build and install! To build, just run make If this step went well, you'll now need to install the Resin files as the root user: sudo make install Wherever you install Resin to (using the --prefix), we'll refer to that directory as (typically /usr/local/share/resin). The configuration directory is called (typically /etc/resin). The root directory where configuration, HTML files and war files are located is called (typically /var/resin). If you have a license file for Resin, save it in (typically /etc/resin/licenses). Installing Resin using the .deb package on Ubuntu and DebianWe provide a Debian packaged version of Resin that Debian and Ubuntu users can take advantage of. It performs all of the installation steps above for you and creates all the recommended server and content directories. Simply download from the Resin download page and install using dpkg. Alternatively, you can add Caucho's Debian repository to your system's repositories to use automated update tools like Synaptic and apt-get. To do this, add the following line to your deb http://caucho.com/download/debian unstable multiverse After adding this line, update your local repository cache by running: apt-get update Finally, install Resin Professional using the following: apt-get install resin-pro If you have a license file for Resin, save it in Or install Resin Open Source with this command: apt-get install resin Solaris notesDepending on your Solaris packaging, you make need to give the ./configure script more information to find the openssl libraries and make. For example, if you've installed /usr/sfw, the ./configure might look like: Example: Solaris ./configure unix$ MAKE=gmake ./configure --prefix=`pwd` --with-openssl=/usr/sfw Solaris also defaults to starting in 32-bit mode. To start in 64-bit mode, either add a <jvm-arg>-d64</jvm-arg> (recommended) or start from the command-line with -d64: Example: Solaris starting in 64-bit mode unix$ bin/resin.sh -d64 start Installing Resin on WindowsThe native libraries that are included with Resin are precompiled for Windows in both 32-bit and 64-bit mode. These libraries provide:
(* only available in Resin Professional)
Once your have the Resin server installed, you can start installing your content. Content from the top downResin and JavaEE organize content into "web applications" or webapps. As an administrator, your developers have probably provided you with a webapp in the form of a .war file or a webapp directory. In the Resin root directory is a special subdirectory named which is a webapp deploy directory. Deploying applications in Resin is as easy as copying a .war file or web application directory to one of these webapp deploy directories. Resin detects the applications and deploys them automatically. 
In the directory structure above, notice the special webapp
directory named . This will map to the "/" (root)
application. Other webapps will map to their name. For example,
will map to Permanent content locationsResin is configured to use the content directory structure show above by default. In the examples, the Resin root directory is . This directory is also the recommended content root for Unix. For Windows, the recommended content root is . To specify the root directory to Resin, you pass it on the command line when starting the server. For example: bin/resin.sh --root-directory /var/resin start If you use the Unix startup scripts mentioned in the next section, they automatically specify the root and log directories. Creating Unix startup scripts for ResinWhen you installed using the .deb package or when you ran " /etc/init.d/resin start Use the tools that came with your system to execute the script on startup. Installing Resin as a Windows ServiceResin can be instaled as a Windows Service by executing the . is a GUI utiltity that allows to install and un-install Resin windows service. One of the most useful tools provided with Resin is the built-in, web-based administration console. This tool provides detailed information about the operation of the server, a feature that is very useful to administrators, but one which must be kept secure from unauthorized users. If you are deploying Resin to a production machine, it's likely that you won't be running your browser on the same system as the server. In this case, you'll need to configure Resin to allow you to access the server remotely.
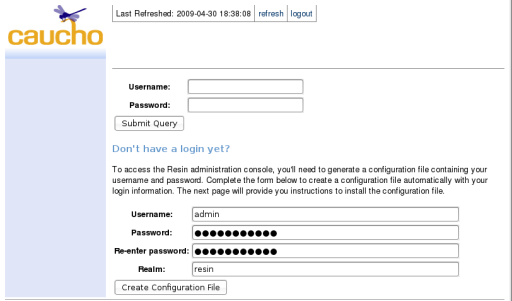
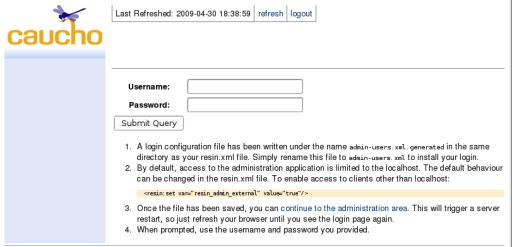
Now that you're able to access the administration application, you have to set up a password and install it. In order to prove that you have access to the machine on which Resin is running, the only way to change the password is to create a file with the authentication information on that machine.
If something went wrong above, the first place to check for problems is the log.
Hopefully, the log message will be clear enough for you to figure out the problem. If not, you have a number of resources available to you to help you figure out what's going wrong:
|

